Syswan Octolinks Sw88 Multi Wan Router Quick Installation Guide 4s154b
This document was ed by and they confirmed that they have the permission to share it. If you are author or own the copyright of this book, please report to us by using this report form. Report 2z6p3t
Overview 5o1f4z
& View Syswan Octolinks Sw88 Multi Wan Router Quick Installation Guide as PDF for free.
More details 6z3438
- Words: 1,455
- Pages: 4
OCTOLINKS SW88 SERIES
Quick Start Guide For advanced setup please refer to your Guide on the CD-ROM for more detailed information.
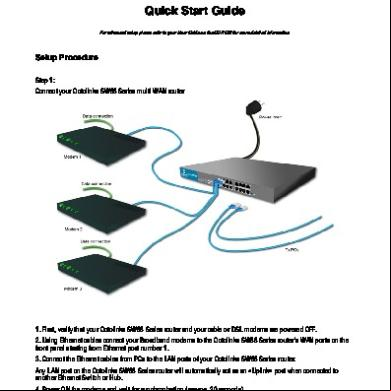
Setup Procedure Step 1: Connect your Octolinks SW88 Series multi WAN router
1. First, that your Octolinks SW88 Series router and your cable or DSL modems are powered OFF. 2. Using Ethernet cables connect your Broadband modems to the Octolinks SW88 Series router’s WAN ports on the front starting from Ethernet port number 1. 3. Connect the Ethernet cables from PCs to the LAN ports of your Octolinks SW88 Series router. ny LAN port on the Octolinks SW88 Series router will automatically act as an «Uplink» port when connected to A another Ethernet Switch or Hub. 4. Power ON the modems and wait for synchronization (approx. 30 seconds). 5. Plug in the power cord of the Octolinks SW88 Series router to an electrical outlet and connect it into the AC input on the back . Immediately the Power LED of your router will light up. 6. The corresponding WAN – Link/ACT LED will be ON if the WAN port is correctly connected to a Broadband modem. 7. For each PC connected to the LAN ports, the corresponding LAN – Link/ACT LED will be ON.
Step 2: Configure your Internet Access Make sure you have all the setup instructions provided by your ISP. If not, your ISP to obtain all the necessary instructions for accessing the Internet using your Broadband modems before proceeding. NOTE : Your PC’s Ethernet adapter should be set to obtain an IP address automatically. For more information, refer to your OS help or the Appendix A of this document. 1. Start your PC. If your PC is already running, restart it. It will automatically obtain an IP address from the Octolinks SW88 Series router using DH. 2. Open your web browser. 3. In the Address or Location box of your web browser enter: https://192.168.1.1 4. If shown, accept the SSL security information alert. 5. You will be prompted for a Name and . Enter for the « Name» Leave the «» field blank The default name is . On the setup page you will see next, you will be able to modify the default name and set a . Once done, select Submit. It is recommended that you set a to prevent unauthorized access to your router. Select “Go to primary setup” to go to the Primary Setup page. If you have modified the name or defined a you will then be prompted to re-enter the new information. 6. You will be then directed to the Primary Setup page. First, you will need to define the maximum number of WAN ports that will be used for this setup. The unit is factory set for two (2) WAN ports and fourteen (14) LAN ports. The WAN ports could be set to a maximum of eight (8). In the Primary Setup section you will need to enter the information provided by your ISP. You can configure your WAN links using the following four possibilities with the information provided by your ISP. a) S tatic IP Select Static IP from the Connection Type drop-down menu if your ISP states that you are connecting through Static IP. Enter the IP Address, Subnet Mask, Gateway from the Address Information section. You will need to enter at least one DNS Server information. Submit to save your configuration. b) Dynamic IP Select Dynamic IP from the Connection Type drop-down menu if your ISP states that you are connecting through Dynamic IP (DH). You will need to enter at least one DNS Server information (Optional for Dynamic IP). Submit to save your configuration. c) P PPoE Select PPPoE from the Connection Type drop-down menu if your ISP states that you are connecting through PPPoE. Enter the Name, and other required information provided by your ISP in the PPPoE Dialup section. Submit to save your configuration. d) PPTP Choose the correct connection method indicated by your ISP, enable the PPTP Connection option and enter the relevant PPTP information provided by your ISP. Submit to save your configuration. 7. Repeat this procedure for each WAN port. When all WAN links are correctly configured, select Submit and Reboot to save and activate your configuration.
Congratulations ! Your router setup is now complete.
Appendix A : Configuring PCs on your LAN 1. Restart each PC connected to the LAN ports of your router in order to automatically obtain an IP address (DH) from your Octolinks SW88 Series router. 2. Ensure that your PCs are configured to use the Octolinks SW88 Series router for Internet access, as described below. For Windows 9x/2000 1. Select Start Menu - Settings - Control - Internet Options. 2. Select the Connection tab, and click the Setup button. 3. Select «I want to set up my Internet connection manually, or I want to connect through a local area network (LAN)» and click Next. 4. Select «I connect through a local area network (LAN)» and click Next. 5. Ensure all of the boxes on the following Local Area Network Internet Configuration screen are unchecked. 6. Check the «No» option when prompted «Do you want to set up an Internet mail now?». 7. Click Finish to close the Internet Connection Wizard. You may be required to restart your machine. For Windows XP 1. Select Start Menu - Control - Network and Internet Connections. 2. Select Set up or change your Internet Connection. 3. Select the Connection tab, and click the Setup button. 4. Cancel the pop-up «Location Information» screen. 5. Click Next on the «New Connection Wizard» screen. 6. Select «Connect to the Internet» and click Next. 7. Select «Set up my connection manually» and click Next. 8. Check «Connect using a broadband connection that is always on» and click Next. 9. Click Finish to close the New Connection Wizard. For Windows Vista 1. Select Start Menu - Control - Network and Internet.
If your Control is in Classic View, click Network and Sharing Center. 2. In Network and Internet select Network and Sharing Center. 3. In the Network and Sharing Center Tasks tab, select Manage network connections. 4. In Manage Network Connections, double click Local Area Connection. 5. In the Local Area Connection Status window, select Properties. 6. In the LAN Properties select Internet Protocol Version 4 (T/IPv4) and click Properties. 7. Ensure that Obtain an IP address automatically and Obtain DNS server address automatically are selected. Macintosh Clients 1. Open the T/IP Control . 2. Select Ethernet from the Connect via pop-up menu. 3. Select Using DH Server from the Configure pop-up menu. The DH Client ID field can be left blank. 4. Close the T/IP , saving your settings. Note: If using manually assigned IP addresses instead of DH, the required changes are: - Set the Router Address field to the IP Address of your Octolinks SW88 Series router. - Ensure your DNS (Name Server) settings are correct.
Linux Clients It is only necessary to set the Octolinks SW88 Series router as the «Gateway» for the Linux Client and ensure your Name Server settings are correct. Make sure that you are logged in as «root» before attempting any changes. Fixed IP Address : By default, most Linux and Unix installations use a fixed IP Address. If you wish to continue using a fixed IP Address, make the following changes to your configuration. 1. Set your Default Gateway to the IP Address of your Octolinks SW88 Series router. 2. Ensure your DNS (Name server) settings are correct. DH Client (recommended) : The procedure below may vary according to your version of Linux and X-windows shell. 1. Start your X-windows client. 2. Select Control - Network 3. Select the «Interface» entry for your Network card. Normally, this will be called «eth0». 4. Click the Edit button, set the «protocol» to «DH», and save this data. 5. To apply your changes use the «Deactivate» and «Activate» buttons if available or restart your system.
SYSWAN TECHNOLOGIES, INC., 2050 Beavercreek Rd, Suite 101-388, Oregon City OR 97045, USA.
For any additional information or assistance refer to your Manual on the CD or visit our web site.
Phone USA / Canada : 1 - 877 - 7 - SYSWAN (Toll Free : 1 - 877 - 779 - 7926) Phone International : 00 - 1 - 541 - 393 - 2222 E-mail : [email protected] Website : http://www.syswan.com/
SW88QIGV2BUS Specifications are subject to change without notice. All brand and product names are trademarks or ed trademarks of their respective holders. © 2007 - 2008 Syswan Technologies Inc. All rights reserved.
Quick Start Guide For advanced setup please refer to your Guide on the CD-ROM for more detailed information.
Setup Procedure Step 1: Connect your Octolinks SW88 Series multi WAN router
1. First, that your Octolinks SW88 Series router and your cable or DSL modems are powered OFF. 2. Using Ethernet cables connect your Broadband modems to the Octolinks SW88 Series router’s WAN ports on the front starting from Ethernet port number 1. 3. Connect the Ethernet cables from PCs to the LAN ports of your Octolinks SW88 Series router. ny LAN port on the Octolinks SW88 Series router will automatically act as an «Uplink» port when connected to A another Ethernet Switch or Hub. 4. Power ON the modems and wait for synchronization (approx. 30 seconds). 5. Plug in the power cord of the Octolinks SW88 Series router to an electrical outlet and connect it into the AC input on the back . Immediately the Power LED of your router will light up. 6. The corresponding WAN – Link/ACT LED will be ON if the WAN port is correctly connected to a Broadband modem. 7. For each PC connected to the LAN ports, the corresponding LAN – Link/ACT LED will be ON.
Step 2: Configure your Internet Access Make sure you have all the setup instructions provided by your ISP. If not, your ISP to obtain all the necessary instructions for accessing the Internet using your Broadband modems before proceeding. NOTE : Your PC’s Ethernet adapter should be set to obtain an IP address automatically. For more information, refer to your OS help or the Appendix A of this document. 1. Start your PC. If your PC is already running, restart it. It will automatically obtain an IP address from the Octolinks SW88 Series router using DH. 2. Open your web browser. 3. In the Address or Location box of your web browser enter: https://192.168.1.1 4. If shown, accept the SSL security information alert. 5. You will be prompted for a Name and . Enter for the « Name» Leave the «» field blank The default name is . On the setup page you will see next, you will be able to modify the default name and set a . Once done, select Submit. It is recommended that you set a to prevent unauthorized access to your router. Select “Go to primary setup” to go to the Primary Setup page. If you have modified the name or defined a you will then be prompted to re-enter the new information. 6. You will be then directed to the Primary Setup page. First, you will need to define the maximum number of WAN ports that will be used for this setup. The unit is factory set for two (2) WAN ports and fourteen (14) LAN ports. The WAN ports could be set to a maximum of eight (8). In the Primary Setup section you will need to enter the information provided by your ISP. You can configure your WAN links using the following four possibilities with the information provided by your ISP. a) S tatic IP Select Static IP from the Connection Type drop-down menu if your ISP states that you are connecting through Static IP. Enter the IP Address, Subnet Mask, Gateway from the Address Information section. You will need to enter at least one DNS Server information. Submit to save your configuration. b) Dynamic IP Select Dynamic IP from the Connection Type drop-down menu if your ISP states that you are connecting through Dynamic IP (DH). You will need to enter at least one DNS Server information (Optional for Dynamic IP). Submit to save your configuration. c) P PPoE Select PPPoE from the Connection Type drop-down menu if your ISP states that you are connecting through PPPoE. Enter the Name, and other required information provided by your ISP in the PPPoE Dialup section. Submit to save your configuration. d) PPTP Choose the correct connection method indicated by your ISP, enable the PPTP Connection option and enter the relevant PPTP information provided by your ISP. Submit to save your configuration. 7. Repeat this procedure for each WAN port. When all WAN links are correctly configured, select Submit and Reboot to save and activate your configuration.
Congratulations ! Your router setup is now complete.
Appendix A : Configuring PCs on your LAN 1. Restart each PC connected to the LAN ports of your router in order to automatically obtain an IP address (DH) from your Octolinks SW88 Series router. 2. Ensure that your PCs are configured to use the Octolinks SW88 Series router for Internet access, as described below. For Windows 9x/2000 1. Select Start Menu - Settings - Control - Internet Options. 2. Select the Connection tab, and click the Setup button. 3. Select «I want to set up my Internet connection manually, or I want to connect through a local area network (LAN)» and click Next. 4. Select «I connect through a local area network (LAN)» and click Next. 5. Ensure all of the boxes on the following Local Area Network Internet Configuration screen are unchecked. 6. Check the «No» option when prompted «Do you want to set up an Internet mail now?». 7. Click Finish to close the Internet Connection Wizard. You may be required to restart your machine. For Windows XP 1. Select Start Menu - Control - Network and Internet Connections. 2. Select Set up or change your Internet Connection. 3. Select the Connection tab, and click the Setup button. 4. Cancel the pop-up «Location Information» screen. 5. Click Next on the «New Connection Wizard» screen. 6. Select «Connect to the Internet» and click Next. 7. Select «Set up my connection manually» and click Next. 8. Check «Connect using a broadband connection that is always on» and click Next. 9. Click Finish to close the New Connection Wizard. For Windows Vista 1. Select Start Menu - Control - Network and Internet.
If your Control is in Classic View, click Network and Sharing Center. 2. In Network and Internet select Network and Sharing Center. 3. In the Network and Sharing Center Tasks tab, select Manage network connections. 4. In Manage Network Connections, double click Local Area Connection. 5. In the Local Area Connection Status window, select Properties. 6. In the LAN Properties select Internet Protocol Version 4 (T/IPv4) and click Properties. 7. Ensure that Obtain an IP address automatically and Obtain DNS server address automatically are selected. Macintosh Clients 1. Open the T/IP Control . 2. Select Ethernet from the Connect via pop-up menu. 3. Select Using DH Server from the Configure pop-up menu. The DH Client ID field can be left blank. 4. Close the T/IP , saving your settings. Note: If using manually assigned IP addresses instead of DH, the required changes are: - Set the Router Address field to the IP Address of your Octolinks SW88 Series router. - Ensure your DNS (Name Server) settings are correct.
Linux Clients It is only necessary to set the Octolinks SW88 Series router as the «Gateway» for the Linux Client and ensure your Name Server settings are correct. Make sure that you are logged in as «root» before attempting any changes. Fixed IP Address : By default, most Linux and Unix installations use a fixed IP Address. If you wish to continue using a fixed IP Address, make the following changes to your configuration. 1. Set your Default Gateway to the IP Address of your Octolinks SW88 Series router. 2. Ensure your DNS (Name server) settings are correct. DH Client (recommended) : The procedure below may vary according to your version of Linux and X-windows shell. 1. Start your X-windows client. 2. Select Control - Network 3. Select the «Interface» entry for your Network card. Normally, this will be called «eth0». 4. Click the Edit button, set the «protocol» to «DH», and save this data. 5. To apply your changes use the «Deactivate» and «Activate» buttons if available or restart your system.
SYSWAN TECHNOLOGIES, INC., 2050 Beavercreek Rd, Suite 101-388, Oregon City OR 97045, USA.
For any additional information or assistance refer to your Manual on the CD or visit our web site.
Phone USA / Canada : 1 - 877 - 7 - SYSWAN (Toll Free : 1 - 877 - 779 - 7926) Phone International : 00 - 1 - 541 - 393 - 2222 E-mail : [email protected] Website : http://www.syswan.com/
SW88QIGV2BUS Specifications are subject to change without notice. All brand and product names are trademarks or ed trademarks of their respective holders. © 2007 - 2008 Syswan Technologies Inc. All rights reserved.
Related Documents c2h70
Syswan Octolinks Sw88 Multi Wan Router Quick Installation Guide 4s154b
December 2019 29
Syswan Octolinks Sw88 Multi Wan Router Guide 6w4w20
December 2019 24
Syswan Duolinks Sw24 Series Dual Wan Router Quick Installation Guide 27725r
January 2022 0
Syswan Duolinks Sw24 Series Dual Wan Router Guide 3z6y7
November 2019 25
Quick Installation Guide-fi9821w 2z2kd
November 2022 0
Quick Installation Guide x4f12
December 2019 36More Documents from "Syswan Technologies, Inc." 146fy
Syswan Octolinks Sw88 Multi Wan Router Quick Installation Guide 4s154b
December 2019 29
Syswan Octolinks Sw88 Multi Wan Router Guide 6w4w20
December 2019 24
Syswan Duolinks Sw24 Series Dual Wan Router Guide 3z6y7
November 2019 25
Syswan Duolinks Sw24 Series Dual Wan Router Quick Installation Guide 27725r
January 2022 0
Altibox Automates Network Diagramming With Opnet Netmapper 5h5if
December 2021 0