Pic Engrave Software Manual 4f2q2p
This document was ed by and they confirmed that they have the permission to share it. If you are author or own the copyright of this book, please report to us by using this report form. Report 2z6p3t
Overview 5o1f4z
& View Pic Engrave Software Manual as PDF for free.
More details 6z3438
- Words: 539
- Pages: 12
Tutorial for Version 5.0.x December 2014 Start PicEngrave Pro 5 and the following screen displays.
Click on the
1
button.
Click on the
button to select an image.
Select an image and click the
button at the bottom of the file window.
This screen then displays the image info and the size of the engraved image.
2
Click on the
button to review/change the program's parameter and option settings.
After editing/reviewing programs settings, click the Clicking the or current program run.
button will allow setting you’ve changed to be used only for the
Clicking either button returns to the previous screen.
3
button to save your changes.
If you have selected the ellipse or crop options, a set of adjustment sliders will now appear below the image. Adjust these sliders to select the area of the image that will be used to generate a gcode file.
Click on the
button to proceed, and a
button will appear.
At this point, you can still select a different image, or change engraving parameters. To proceed with the current image, click the
button.
After a short time interval, a button will appear. Click it to proceed. You can then either enter a file name for the gcode file, or accept the default name.
As the gcode file is saved, a series of colored lines will scroll down the image. When complete, you can either PicEngrave Pro 5, or select another image to convert.
4
Clicking the button opens a sub-program where you can select an image and change its properties or dither it before generating a gcode file. When finished editing, save the edited image to your computer, then exit and reopen the newly edited image in the main program.
Text can be added to an image in another sub-program by clicking the main starting screen.
button on the
---------------------------------------------------------------------------------------------This short tutorial covers the basic operation of PicEngrave Pro 5. Please don't hesitate to experiment. Use Mach3 (or whatever gcode preview software you prefer) to view your results before beginning actual engraving operations. Be sure to read the Instructions in the Help menu for additional information.
5
Initial Program Settings Setting image engraving options and values is highly dependent upon each ’s cnc machine, operation, and material being engraved. The following screen shots can be used to initially setup PEP5 with conservative settings to produce gcode for each engraving mode. As experience is gained with the engraving mode selected, engraving options and values can be added or changed as desired. Spindle Engraving (wood)
6
Spindle Engraving (lithophane)
7
Laser Analog Engraving
8
Laser TTL Engraving
9
Laser VFR Engraving (wood)
10
Laser VFR Engraving (mirrors)
11
Laser Mach3 TTL Engraving
PicEngrave Pro 5 is frequently updated and features are added as the author and s develop new methods of image engraving, especially using laser diodes. The version of PEP5 that is currently available may not exactly correspond to the screen images in this tutorial, but using this tutorial as a guide should help get you close. Please don’t hesitate to us through our web site if you have questions not covered here or in the other usage documents supplied. Thank You, John Champlain and Jeff Woodcock www.picengrave.com Revised December 2014
12
Click on the
1
button.
Click on the
button to select an image.
Select an image and click the
button at the bottom of the file window.
This screen then displays the image info and the size of the engraved image.
2
Click on the
button to review/change the program's parameter and option settings.
After editing/reviewing programs settings, click the Clicking the or current program run.
button will allow setting you’ve changed to be used only for the
Clicking either button returns to the previous screen.
3
button to save your changes.
If you have selected the ellipse or crop options, a set of adjustment sliders will now appear below the image. Adjust these sliders to select the area of the image that will be used to generate a gcode file.
Click on the
button to proceed, and a
button will appear.
At this point, you can still select a different image, or change engraving parameters. To proceed with the current image, click the
button.
After a short time interval, a button will appear. Click it to proceed. You can then either enter a file name for the gcode file, or accept the default name.
As the gcode file is saved, a series of colored lines will scroll down the image. When complete, you can either PicEngrave Pro 5, or select another image to convert.
4
Clicking the button opens a sub-program where you can select an image and change its properties or dither it before generating a gcode file. When finished editing, save the edited image to your computer, then exit and reopen the newly edited image in the main program.
Text can be added to an image in another sub-program by clicking the main starting screen.
button on the
---------------------------------------------------------------------------------------------This short tutorial covers the basic operation of PicEngrave Pro 5. Please don't hesitate to experiment. Use Mach3 (or whatever gcode preview software you prefer) to view your results before beginning actual engraving operations. Be sure to read the Instructions in the Help menu for additional information.
5
Initial Program Settings Setting image engraving options and values is highly dependent upon each ’s cnc machine, operation, and material being engraved. The following screen shots can be used to initially setup PEP5 with conservative settings to produce gcode for each engraving mode. As experience is gained with the engraving mode selected, engraving options and values can be added or changed as desired. Spindle Engraving (wood)
6
Spindle Engraving (lithophane)
7
Laser Analog Engraving
8
Laser TTL Engraving
9
Laser VFR Engraving (wood)
10
Laser VFR Engraving (mirrors)
11
Laser Mach3 TTL Engraving
PicEngrave Pro 5 is frequently updated and features are added as the author and s develop new methods of image engraving, especially using laser diodes. The version of PEP5 that is currently available may not exactly correspond to the screen images in this tutorial, but using this tutorial as a guide should help get you close. Please don’t hesitate to us through our web site if you have questions not covered here or in the other usage documents supplied. Thank You, John Champlain and Jeff Woodcock www.picengrave.com Revised December 2014
12
Related Documents c2h70

Pic Engrave Software Manual 4f2q2p
July 2021 0
Pic 6.0 Manual 4p5mg
November 2019 57
Manual Pic 18f2550 4d3j1d
December 2021 0
Pic 6g6950
January 2021 0
Manual De Pic 5524w
February 2021 0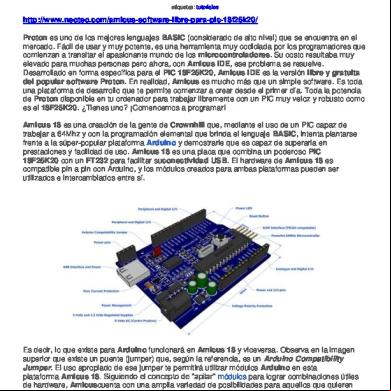
Amicus Software Libre Para Pic 18f25k20 6q6l4e
December 2019 11More Documents from "Ricardo Mendonca" 1k5v4m
Pic Engrave Software Manual 4f2q2p
July 2021 0
Dhirubhai Ambani 52l63
November 2021 0
istracao De Materiais 685p3k
October 2022 0
Physical Evidence In Service Marketing. 6i5d38
December 2019 30
Elementos Do Contrato De Trabalho 386e4g
October 2019 57