Motherboard Architecture 1g603p
This document was ed by and they confirmed that they have the permission to share it. If you are author or own the copyright of this book, please report to us by using this report form. Report 2z6p3t
Overview 5o1f4z
& View Motherboard Architecture as PDF for free.
More details 6z3438
- Words: 1,913
- Pages: 15
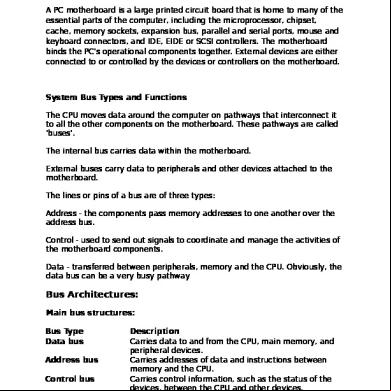
Motherboard Components and Architectures : A PC motherboard is a large printed circuit board that is home to many of the essential parts of the computer, including the microprocessor, chipset, cache, memory sockets, expansion bus, parallel and serial ports, mouse and keyboard connectors, and IDE, EIDE or SCSI controllers. The motherboard binds the PC's operational components together. External devices are either connected to or controlled by the devices or controllers on the motherboard.
System Bus Types and Functions The U moves data around the computer on pathways that interconnect it to all the other components on the motherboard. These pathways are called 'buses'. The internal bus carries data within the motherboard. External buses carry data to peripherals and other devices attached to the motherboard. The lines or pins of a bus are of three types: Address - the components memory addresses to one another over the address bus. Control - used to send out signals to coordinate and manage the activities of the motherboard components. Data - transferred between peripherals, memory and the U. Obviously, the data bus can be a very busy pathway
Bus Architectures: Main bus structures: Bus Type Data bus Address bus Control bus
Description Carries data to and from the U, main memory, and peripheral devices. Carries addresses of data and instructions between memory and the U. Carries control information, such as the status of the devices, between the U and other devices.
As well as the processor bus (also known as the Front-Side Bus or FSB), these are the other buses you may encounter: ISA - the original PC expansion slot for 8-bit cards. EISA - introduced when the 286 processor was available as it could access 16 bits. PCI - a 64-bit bus, though it is usually implemented as a 32-bit bus. It can run at clock speeds of 33 or 66MHz. AGP - Accelerated Graphics Port based on the PCI slot but designed for graphical throughput. PCI Express - double the rate of PCI and uses two serial rather than one parallel data bus
Form Factors The shape, packaging, and to a certain extent, the function of a motherboard are defined by its form factor. Many different form factors are available; the three most commonly used factors are:
AT - patterned after the original IBM PC AT motherboard. Baby AT - a smaller version of the AT form factor motherboard.
ATX - similar in size to the Baby AT, the ATX adds features. The ATX motherboard allows for easier installation of full-length expansion cards and cables and is easier to cool.
BTX - (Balanced Technology eXtended) designed to address some of the issues with the ATX form factor that was halting performance improvements, such as its cooling properties. BTX was introduced to improve airflow and cooling, thus enabling faster (and therefore hotter) Us to be used.
Proprietary - Many motherboard manufacturers chose to develop their own form factors intending to make use of ideas gained from previous form factors and their limitations.
Form Factor Table : Form factor IBM PC
Width (inches) 8.5
Length (inches) Design type 13 Motherboard
IBM PC XT AT0 Baby AT LPX Micro-AT ATX Mini-ATX Mini-LPX Micro-ATX NLX Nano-ITX
8.5 12 8.5 9 8.5 12 11.2 8-9 9.6 8-9 4.7
13 11-13 10-13 11-13 8.5 9.6 8.2 10-11 9.6 10-13.6 4.7
Motherboard Motherboard Motherboard Backplane Motherboard Motherboard Motherboard Backplane Motherboard Backplane Motherboard
Types of Motherboards :
AT After the early success of its PC and PC XT models, IBM introduced its 16-bit PC AT, which added enough additional circuitry to increase the size of its motherboard (and case). The size, shape and mounting placements of the AT's case were the standard that clone manufacturers used for their motherboards. The popularity of the PC AT and its form factor established it as the first real motherboard form factor standard.
Baby AT Following the success of the IBM PC AT, clone manufacturers began releasing their own 16-bit PCs. Higher integration technology reduced the space
required by chipsets and circuitry, which allowed the motherboard to be reduced as much as 3.5 inches in width and 2 inches in height. This new style board became known as the Baby AT. The number of expansion slots on these motherboards are less than the number available on the AT motherboards.
ATX The ATX form factor is generally based on the smaller Baby AT motherboard size. However, size is about all they have in common. The ATX form rotates the motherboard's orientation by 90 degrees and incorporates a new set of mounting locations and power connections. The I/O ports on an ATX motherboard are in a two-row block on the back of the PC.
The top row includes a PS/2-type keyboard or mouse connector and a parallel port. The bottom row includes a second PS/2-type keyboard or mouse connector, two USB ports and two serial ports.
ATX Detailed : The ATX mounts the U and RAM away from its expansion slots and closer to the power supply's cooling fan, as shown here. This arrangement improves the amount of airflow available to cool the U and RAM chips.
ATX Examined The ATX power supply fan originally pulled air into the case, flowing over the U and out of the case's vents. Newer ATX designs vent the case by pulling hot air away from the U and RAM and ing it out of the case. The ATX design also s an additional case fan, which is recommended for PCs with 3-D video accelerators, multiple hard drives and other high-heat-producing adapter cards. The ATX design also incorporates a number of features into the power system. The motherboard can control the power on and off functions of the power supply, a feature called soft switching. The ATX design provides split voltages (usually 12V, 5V and 3.3V) to the motherboard, which eliminates the need for a voltage regulator included on earlier form factor motherboards.
BTX Form Factor:
The BTX-based motherboard layout differs significantly from ATX/microATX, and requires designs built specifically for BTX. It has moved the U and other components to the front of the case nearer the intake fan, thus resulting in improved airflow. BTX also allows for multiple board sizes utilising a common core. Due to the changes in motherboard layout, the BTX form factor requires a different case style, than for other types of form factor. Figure above shows a BTX style case and motherboard.
Chipsets The bus structures and interfaces ed by the motherboard and U are controlled by functions included on the chipset. The chipset controls the bits (data, addresses and control signals) that flow between the U and system memory over the motherboard's buses. The chipset manages data transfers between the U, memory and peripheral devices. It also s the expansion bus and any power management features of the system. However, the chipset contains only enough instructions to issue control commands to device drivers, which actually control the peripheral device. A PC's chipset is matched to the motherboard and the U as a set. Usually, a given chipset is matched to a single processor type; however, some chipsets more than one processor.
Northbridge and South Bridge : Chipsets, especially two-chip chipsets, are divided into a North Bridge (the larger chip) and a South Bridge (the smaller chip). The North Bridge provides and control for main memory, cache memory and the PCI bus controllers. The South Bridge provides control for periphera l devices and those controllers that are not
essential to the PC's basic functions, such as the serial port controller. Other chipsets are on the motherboard include the keyboard controller and a superset of input/output device controllers called the Super I/O controller.
U Mountings Processor Designed for Socket
Processor Designed for Slot
The two general types of mountings used to attach processors to the motherboard are sockets and slots. Slots Slots 1 2 A M
Description SC-242 (Slot Connector - 242 pins) connector is a proprietary Intel connector that is used for Celeron, Pentium II and Pentium III processors. SC-330 connector is an Intel mounting for its Pentium II Xeon and Pentium III Xeon chips. For AMD Athlon processors; it looks the same as a Slot 1 connector but uses different pin assignments. Designed to hold the 64-bit Intel Itanium processor.
Sockets Socket 4
:
Description Mounts the 273-pin PGA package of the Pentium 60 and Pentium 66 processors 5 Mounts the 320-pin Staggered Pin Grid Array (SPGA) of early 3 V Pentium processors 7 Mounts the 321-pin SPGA of the later-release Pentium processors and the chips of AMD, Cyrix and IDT Super 7 An extension of the Socket 7 design that is used for the AMD K6 processors 8 A 387-pin SPGA zero-insertion-force (ZIF) socket for the Pentium Pro processor 370 Designed for the Celeron processor in Plastic Pin Grid Array (PPGA) packaging, but used for several later processors. Uses 370 pins
423/478 Used for Pentium P4 A/462 This is an AMD 462-pin socket that replaced the Slot A mounting for the newer Athlon, Sempron and Duron processors 754/939 Used for the AMD 64 processors and Sempron (754 only)
U Characteristics The microprocessor is an integrated circuit that contains millions of transistors interconnected by small aluminium wires. The microprocessor's processing capabilities control and direct the activities of the PC by interacting with the other electronic components on the motherboard. The bus carries the various signals, addresses and data that move between the PC's components. Bus structures have different sizes (width), ranging from 16 to 64 bits (data channels) on modern microprocessors. The larger the size of the bus the more data can be moved at the same time.
Main bus structures: Bus Type Data bus Address bus Control bus
Description Carries data to and from the U, main memory, and peripheral devices. Carries addresses of data and instructions between memory and the U. Carries control information, such as the status of the devices, between the U and other devices.
How to Troubleshoot for Motherboard Failures Motherboard failures can be divided into three types:
Power failure Bus failure
Component failure.
Due to the complexity in the structure and components in computer motherboards, the failure rate is relatively high. Repair the failure using the following steps .
Step 1 : Check that there is no sign of physical damage. Determine whether the motherboard seems burned, blown, foam board, has a broken connector, corrosion, exploded capacitors or dirty fans and chips, etc.
Step 2: Check that BIOS battery provides sufficient voltage.
Step 3 : Clean out the dust using a soft brush. Clean the dust off the motherboard. Check the motherboard after each step. The failure may have been caused by dust.
Step 4 : Using a multimeter, measure the motherboard supply voltages (5V, 12V, 3.3V, etc.). If there is an abnormal voltage, check if the power supply is faulty.
Step 5 : Check the all chip clock, input and output signals, Until you find the faulty component.
Step 6 :
Remove and replace the failed component(s) with the same type, then boot to test operation.
Step 7 : Use the tangent line by line method to find short routes. If you find some signal line and ground or 5V voltage line short circuit, trace the circuit board to determine the failure source.
Step 8 : If the above steps fail to fix the problem, find a motherboard with the same characteristics and replace it completely .
.
Related Documents c2h70
Motherboard Architecture 1g603p
December 2019 66
Motherboard 4z6l6h
November 2022 0
Motherboard 4z6l6h
August 2021 0
Manual Motherboard 5k1t20
July 2021 0
Foxconn Motherboard 46236c
October 2019 907
Artikel Motherboard 1b224b
November 2019 46More Documents from "Abhishek Deb" 4z6l32
Motherboard Architecture 1g603p
December 2019 66
10puntosclaves.pdf 3h5c4
February 2023 0
2nd-grade-2-reading-comprehension-worksheet-clean-park.pdf 5xr4j
November 2019 940
Memoirs By Pablo Neruda 4x3to
December 2021 0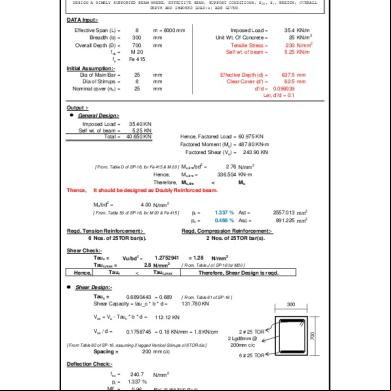
Beam Design By Sp 16 4t3w3k
December 2019 51