Atmel Sam-ba Tool 21142
This document was ed by and they confirmed that they have the permission to share it. If you are author or own the copyright of this book, please report to us by using this report form. Report 2z6p3t
Overview 5o1f4z
& View Atmel Sam-ba Tool as PDF for free.
More details 6z3438
- Words: 702
- Pages: 7
ICBT_002 - Atmel_SAM-BA_tool - # 9
Atmel SAM-BA tool References - http://www.atmel.com/tools/atmelsam-bain-systemprogrammer.aspx
Installing and patching SAM-BA 2.12 on Windows Retrieve the following three files from the link given in references: 1. sam-ba_2.12.exe 2. sam-ba_2.12_patch5.exe 3. atm6124_cdc_signed.zip Step 1. Run the first file to perform installation of SAM-BA 2.12, then run the second file to patch it to the latest version. Step 2. Extract the contents of the zip file into a temporary location. Connect a PG5 device without SDcard to your Windows workstation. When Windows asks for drivers, point it to the location where you previously extracted the zip file. Step 3. the archive which contains binary files for flashing onto the Dataflash from the following location: http://icbtech.rs/Files/ICBT_002/test/pgv-df-boot-samba.zip Extract this archive to a temporary location. Step 4. Start the SAM-BA program, in the dialog choose correct port and board, then click Connect
Step 5. In the lower part of the main window, in the Scripts drop-down box choose "Enable Dataflash (SPI0 CS0)" and click on the Execute button
2014-01-21
1/7
Step 6. In the same drop-down box choose "Send Boot File" and click on the Execute button
2014-01-21
2/7
Step 7. An open file dialog window comes up, browse to the location where you extracted the pgv-df-boot-samba.zip archive and choose file dataflash_pgavrf_uboot.bin.
2014-01-21
3/7
Immediately after choosing this file the Dataflash programming will start. Below the Execute button you can observe the informational messages about the flashing progress.
Step 8. Disconnect the PG5 device from USB. You're done! Connect the PG5 device to a serial debug cable and power it on. Monitor the output on the debug serial port, if the device actually boots from the Dataflash you will see some informational/debug text which contains the following version string: AT91Bootstrap 3.4
Otherwise if the boot fails, you will see the following output: RomBOOT
Installing and patching SAM-BA 2.12 on Linux Retrieve the following two files: - sam-ba_2.12.zip - sam-ba_2.12_patch5.gz Unpack both files: $ unzip sam-ba_2.12.zip $ gunzip sam-ba_2.12_patch5.gz
You should see a new subdirectory and one additional file: $ ls -l -rw-r--r-- 1 alex alex 21098439 Jan 17 15:10 sam-ba_2.12_patch5 drwxr-xr-x 6 alex alex 4096 Jun 27 2012 sam-ba_cdc_cdc_linux
Enter the sam-ba_cdc_cdc_linux directory and apply the binary patch: $ cd sam-ba_cdc_cdc_linux $ patch -p1 --binary < ../sam-ba_2.12_patch5
Add full path to the samba_cdc_cdc_linux directory to your PATH variable: $ export PATH=${PATH}:/path/to/samba_cdc_cdc_linux
That's it, now try to start the sam-ba executable binary! If everything went fine, a GUI window named "SAM-BA CDC 2.12 patch5" should appear.
Programming a PG5 device's Dataflash with SAM-BA Step 1. Retrieve and unzip the following archive: $ wget http://icbtech.rs/Files/ICBT_002/test/pgv-df-boot-samba.zip $ unzip pgv-df-boot-samba.zip
2014-01-21
4/7
Step 2. Enter the newly created pgv-df-boot-samba directory and list available files: $ ls
at91sam9m10g45ek_demo_linux_dataflash.tcl dataflash_at91sam9m10g45ek.bin pgavrf-dataflashboot-uboot-3.4.bin
u-boot-1.3.4-exp.5-at91sam9m10g45ek-dataflash_cs0.bin ubootEnvtFileDataFlash.bin
uImage-2.6.35.7-at91sam9m10g45ek.bin
Step 3. Remove SDcard from the PG5 device and connect it to your computer using an USB cable. Step 4. Run the samba utility from command line within the pgv-df-boot-samba directory: $ pwd
~/pgv-df-boot-samba $ sam-ba
Step 5. A new GUI window shall appear, select options according to picture below and click Connect! Sam-ba_connect0.png The main window comes up (picture below). Sam-ba_main.png Step 6. From the main menu select "Script File", then "Execute Script File". A select dialog shall appear (picture below). Sam-ba_scriptfile.png Choose file: at91sam9m10g45ek_demo_linux_dataflash.tcl
Step 7. A progress dialog shall appear, and in the lower part of the main window you will see status information about the dataflash programming.
2014-01-21
5/7
Step 8. Close the SAM-BA CDC tool and disconnect the PG5 device from USB. You're done! Connect the PG5 device to a serial debug cable and power it on. Monitor the output on the debug serial port, if the device actually boots from the Dataflash you will see some informational/debug text which contains the following version string: AT91Bootstrap 3.4
Otherwise if the boot fails, you will see the following output: RomBOOT
Files Sam-ba_connect.png
16.4 KB
2014-01-17
Aleksandar Pejic
Sam-ba_main.png
65.4 KB
2014-01-17
Aleksandar Pejic
Sam-ba_scriptfile.png
17.1 KB
2014-01-17
Aleksandar Pejic
Sam-ba_copy.png
70.3 KB
2014-01-17
Aleksandar Pejic
Sam-ba_connect0.png
16.3 KB
2014-01-17
Aleksandar Pejic
sam-ba-win-openbootfile.png
20.6 KB
2014-01-21
Aleksandar Pejic
2014-01-21
6/7
samba-win-sendboot.png
18.2 KB
2014-01-21
Aleksandar Pejic
sam-ba-win-execute.png
18.3 KB
2014-01-21
Aleksandar Pejic
sam-ba-win-connect.png
4.14 KB
2014-01-21
Aleksandar Pejic
2014-01-21
7/7
Related Documents c2h70

Atmel Sam-ba Tool 21142
July 2021 0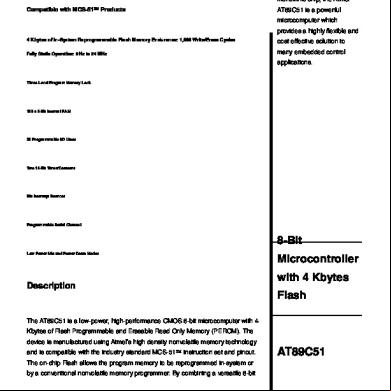
Atmel 89c51 c163f
November 2019 57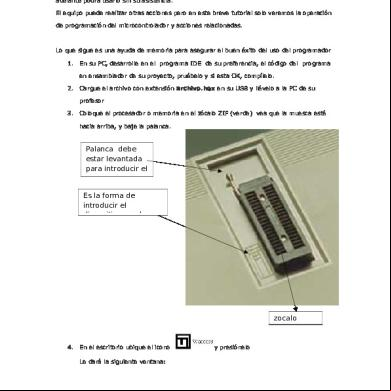
Programador Atmel 4p2t1o
February 2023 0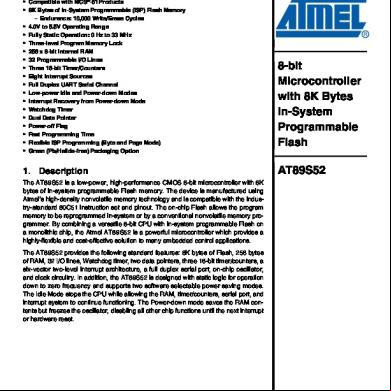
Atmel 89s52 2b113b
November 2019 30
Atmel 24c02 4y5w4s
October 2019 40